jsPsych "Hello world" experiment
In the long tradition of "Hello world!" examples, this tutorial creates an experiment that outputs the phrase "Hello world!" to the browser. Though useless as an actual experiment, the process is helpful for learning the basics of using the jsPsych library. This tutorial will assume that you know very little about how to set up a web page.
Info
If you would like to use modern web development tools (e.g. ES6 modules, Node/NPM, webpack, Babel), you may want to check out the jsPsych Builder CLI utility. jsPsych Builder allows you to automate the experiment setup, spin up a development server, and transpile and bundle scripts and styles. Using jsPsych Builder will automate some of the steps in this tutorial, so if you prefer that option, you may want to switch to the getting started instructions on the jsPsych Builder GitHub page.
Step 1: Download the jsPsych library
Start by downloading the jsPsych library. The most recent version can always be found on the GitHub releases page.
Note: the image below shows version 4.2, but the process is the same for the most recent version.
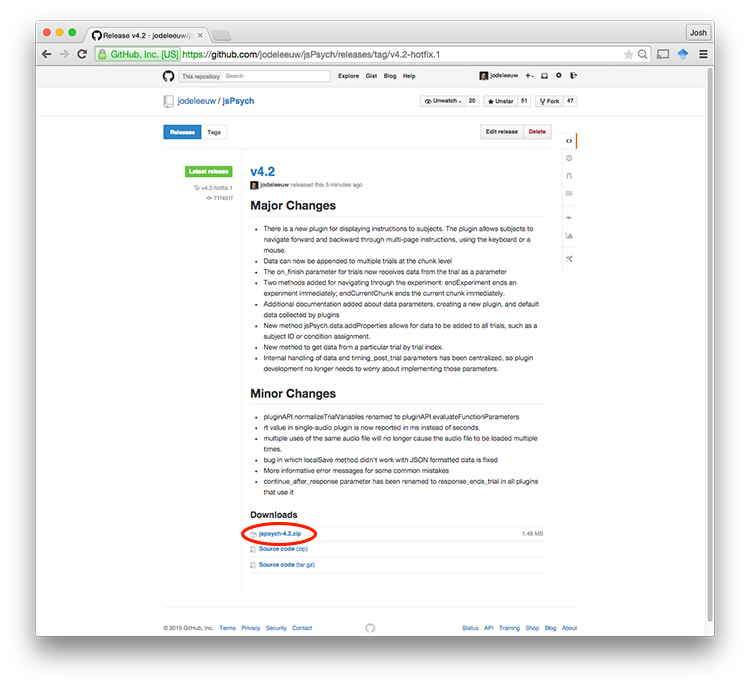
Warning
We strongly recommend downloading the latest release of the code rather than downloading the zip file of the code via the Big Green Button on the GitHub site. Downloading the code via the Big Green Button may give you a copy of the library that is in development and contains bugs.
Step 2: Create a folder to store your experiment files
Create a folder on your computer to put the experiment files in. Once you've created the folder, open the downloaded archive from step 1, and move the extracted folder (called jspsych-6.3.0 if using v6.3.0 of jsPsych) into the experiment folder.
📂 My Experiment
--  📂 jspsych-6.3.0
If you open up the jspsych-6.3.0 folder you should see this structure.
📂 My Experiment
--  📂 jspsych-6.3.0
----  📂 css
----  📂 examples
----  📂 plugins
----  📄 jspsych.js
Step 3: Create a new HTML file
To edit jsPsych code you'll need a programming-friendly text editor. A great free option is Visual Studio Code (Windows, OSX, Linux).
Once you've got a text editor that you like, create a new file in the experiment folder called experiment.html
📂 My Experiment
--  📂 jspsych-6.3.0
--  📄 experiment.html
Step 4: Add the bare-minimum HTML code
There's some basic code that (nearly) all HTML documents have in common. Here's a typical bare-bones HTML document.
<!DOCTYPE html>
<html>
    <head>
        <title>My experiment</title>
    </head>
    <body></body>
</html>
Add the above code to the experiment.html file and save it. If you then open the file in a web browser, you should see a blank page and the title of the page will be 'My experiment'.
Step 5: Import the jsPsych library
To use jsPsych, add a <script> tag to import the library.
<!DOCTYPE html>
<html>
    <head>
        <title>My experiment</title>
        <script src="jspsych-6.3.0/jspsych.js"></script>
    </head>
    <body></body>
</html>
You may also want to import the jsPsych stylesheet, which applies a basic set of visual styles to the experiment to make it visually pleasing. This requires adding a <link> tag to the <head> section of the document.
<!DOCTYPE html>
<html>
    <head>
        <title>My experiment</title>
        <script src="jspsych-6.3.0/jspsych.js"></script>
        <link href="jspsych-6.3.0/css/jspsych.css" rel="stylesheet" type="text/css">
    </head>
    <body></body>
</html>
Step 6: Use the jspsych-html-keyboard-response plugin to print a message
For the demo, we want to show some text on the screen. This is exactly what the jspsych-html-keyboard-response plugin is designed to do. To use the plugin, we need to load it with a <script> tag.
<!DOCTYPE html>
<html>
    <head>
        <title>My experiment</title>
        <script src="jspsych-6.3.0/jspsych.js"></script>
        <script src="jspsych-6.3.0/plugins/jspsych-html-keyboard-response.js"></script>
        <link href="jspsych-6.3.0/css/jspsych.css" rel="stylesheet" type="text/css">
    </head>
    <body></body>
</html>
Once the plugin is loaded, we can create an experiment using the plugin. To declare a trial that uses the html-keyboard-response plugin, we create a JavaScript object with the property type equal to 'html-keyboard-response'. Then we can specify the other parameters of the plugin in the same object.
To add JavaScript code directly to the webpage we need to add a set of <script> tags after the <body> tags.
<!DOCTYPE html>
<html>
    <head>
        <title>My experiment</title>
        <script src="jspsych-6.3.0/jspsych.js"></script>
        <script src="jspsych-6.3.0/plugins/jspsych-html-keyboard-response.js"></script>
        <link href="jspsych-6.3.0/css/jspsych.css" rel="stylesheet" type="text/css">
    </head>
    <body></body>
    <script>

    var hello_trial = {
        type: 'html-keyboard-response',
        stimulus: 'Hello world!'
    }

    </script>
</html>
Now that we have the trial defined we just need to tell jsPsych to run an experiment consisting of this trial. This requires using the jsPsych.init function and specifying the timeline parameter.
<!DOCTYPE html>
<html>
    <head>
        <title>My experiment</title>
        <script src="jspsych-6.3.0/jspsych.js"></script>
        <script src="jspsych-6.3.0/plugins/jspsych-html-keyboard-response.js"></script>
        <link href="jspsych-6.3.0/css/jspsych.css" rel="stylesheet" type="text/css">
    </head>
    <body></body>
    <script>

    var hello_trial = {
        type: 'html-keyboard-response',
        stimulus: 'Hello world!'
    }

    jsPsych.init({
        timeline: [hello_trial]
    })

    </script>
</html>
Once you've saved the file, open it in a browser. You should see "Hello world!" printed on the screen, and if you press a key on the keyboard, the text should disappear (ending the trial).